

friend.tech: The Ultimate Setup Guide
friend.tech: The Ultimate Setup Guide
A step-by-step guide to get you from zero to your true fans

Has the buzz around friend.tech made you curious-enough to try it out, but you don’t know how or where to start? Fret not; you’re both not alone and found this article where I’ll be covering:
Common Terminology
Creating your friend.tech profile
Funding your profile
Buying your first key and what to expect from friend.tech
If you have specific questions after reading this article, feel free to reach out to me on Twitter.

Setup Glossary
friend.tech
The name of the application itself, this is where you’ll setup your profile and subsequently spend time buying/selling keys of creators and connecting with your fans. A “key” here is tokenized access to the associated creator.
Ramp (Payment Processor)
Ramp is a global financial technology company building solutions that connect the crypto economy with today’s financial infrastructure by facilitating credit card to crypto swaps.
Ethereum (blockchain)
The specific blockchain/network/source of truth that serves as the root to the Ethereum ecosystem, which is comprised of multiple “layered” blockchains
Base (blockchain)
A second blockchain which uses the Ethereum
Ethereum (cryptocurrency)
Denoted by the ticker “$ETH” and the symbol ‘Ξ’ - Ethereum can also refer to the asset that powers both the Ethereum and Base networks. All actions that take place on either Ethereum (blockchain) or Base (blockchain) cost a small amount of Ethereum (cryptocurrency) as a fee.
This is the only cryptocurrency you will need for this process.
Bridge
A bridge in the blockchain context is an application that allows users to send assets from one blockchain to another. In this tutorial a bridge is only required if you are in possession of Ethereum (cryptocurrency) on the Ethereum blockchain and want to send it to the Base blockchain (where friend.tech resides).
Glossary Visual
Below is a diagram displaying how the various terms above interplay. If it looks intimidating; don’t worry. The next section is step-by-step with pictures.

Creating your friend.tech profile
Before we get started, make sure you have some required items for profile creation:
Creation Checklist
Invite code
The application is still in invite-only mode and restricted by a code. If you weren’t given one by the friend who shared this, you can just get one shared on Twitter/X.
Some of my extras:
ft-w37tzp3y
ft-x5cpovaq
ft-nsqqscfw
ft-pl71i70k
ft-6w240mda
ft-gbgrw8up
Twitter/X profile
The social platform is used for authenticating user accounts
Install friend.tech
A unique property of friend.tech is that it exists as a website shortcut rather than a dedicated application downloaded from your appstore.
To do this you need to:
Navigate to friend.tech on your phone
Within settings, select “Install App”

Sign up via phone/email
With the friend.tech app installed, you can now sign up using either your phone number or email.
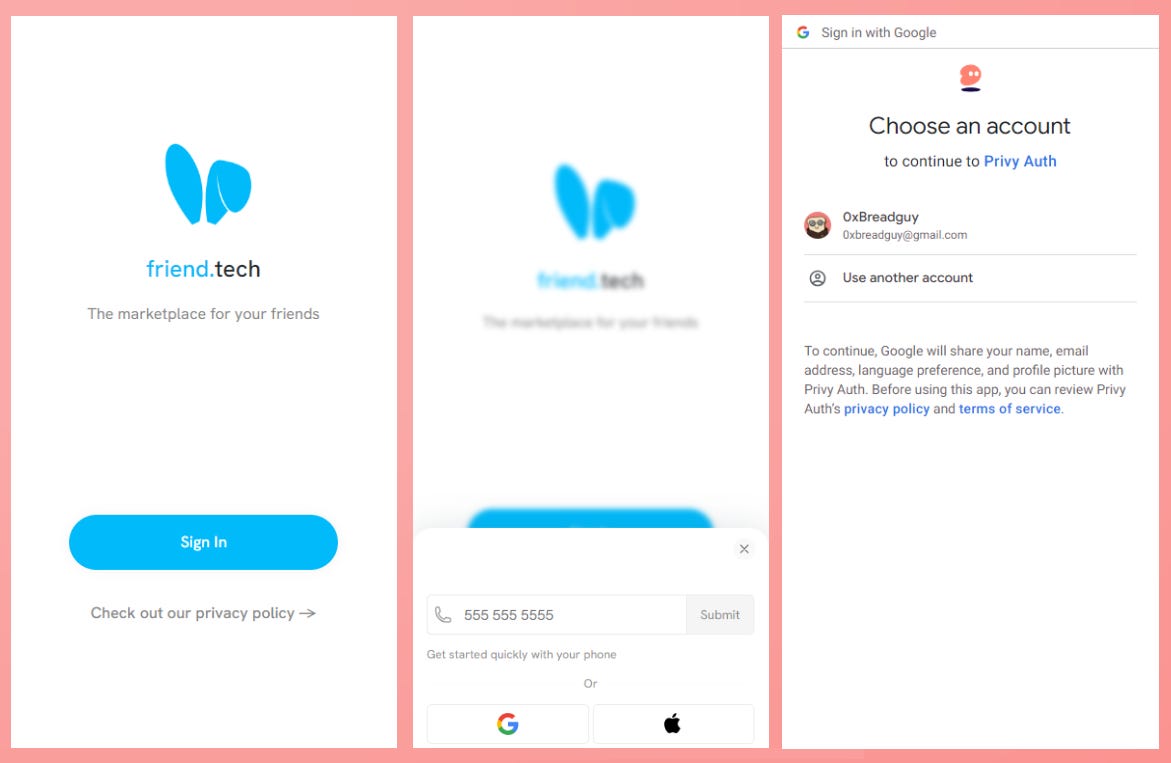
Plug in your checklist items
The next 2 steps are just tying in your required items from the original checklist.

Troubleshooting FAQs
Twitter says I’m already signed in
You may have to sign out of your local Twitter app if the login from the web app says there is a conflict
What if I don’t want to use my email/phone?
That’s okay - you can just spin up a new email to sign-in. That said; be careful as whatever you tie to this account is required for accessing and recovering the wallet Privy creates for you if you don’t save the private key after setup.

Funding your profile
Now that you’re setup with your profile we can work through funding your account and purchasing a key to officially open your room.
That said, the starting point can vary wildly based on crypto familiarity so the section is detailed for both native crypto users and a net-new user.
Crypto Native Funding
If you’re “crypto native,” I’m assuming you’re already in possession of crypto in a self-custody wallet and have performed DEX swaps, NFT mints, etc. Given that, the next step is to just fund the address on created for you by Privy on Base.
The steps are simple:
Acquire $ETH on Base via bridging (if needed)
Deposit in to your new wallet
Selecting a Bridge
If you don’t already have $ETH on Base then you can quickly send over funds from most populate chains.
Some live options are:

Of the above options I personally prefer Squid for their ability to perform any-to-any swaps across their multitude of chains, but if you already have $ETH on another chain it’s hard to ignore the arb opportunity with Synapse where you earn a few tokens on the bridge.
Deposit to Profile Address
Now that you have $ETH on Base, you simply need to send to your address created during profile setup.
To obtain this, follow the below steps:
Home Page: Select the top-right balance
Select “Deposit ETH”
Copy your address (or select Deposit)
NOTE: friend.tech recommends a minimum deposit of ~0.01Ξ (~$20)

Done.
You’re now ready to purchase your first key and enjoy the platform (detailed below).
New User Funding
“I own zero crypto and most of these words are gibberish. Help.”
This next section is for you, young creator. I’ll be walking through the steps of making your first crypto purchase and getting those tokens to your friend.tech profile so you can start connecting to your fans.
Here’s how we’ll do it:
Locate your friend.tech profile
Purchase $ETH with credit card via Ramp
Verify deposit address (optional)
Done
Prep Checklist
To purchase via credit card you’re going to need a few items. Better to grab them now to save you time when you’re in-motion. Here’s what you’ll need:
Credit Card
Government issued ID (Ex: ID, Passport, Residency Permit, Driver’s License)
Ability to take a photo for verification
VPN (optional)
Ready? Ready. 🤝
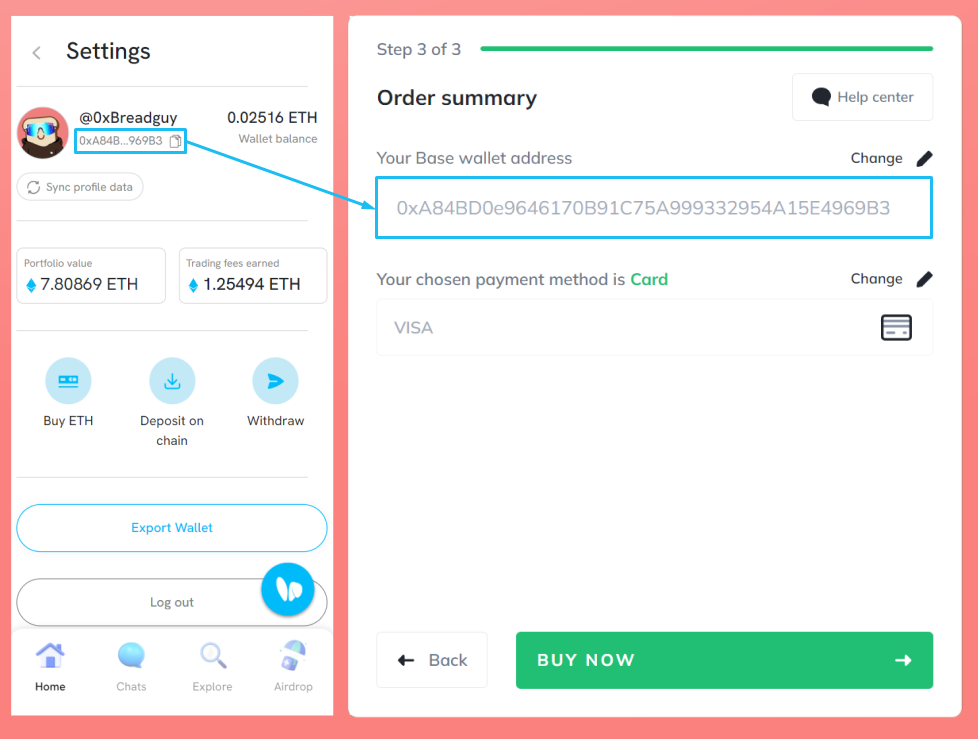
Locate your friend.tech profile
Now that you’ve gathered the above, we can initiate the process by navigating to our profile and selecting the “Buy ETH” button.
Here’s the two-step visual:

Purchase $ETH with credit card via Ramp
The previous step will immediately launch Ramp with some pre-filled info to keep things smooth. Here’s what you’ll be doing…
1) Determine purchase amount, initiate signup
Select your local currency and amount you’d like to purchase

TIP: If you’re receiving a rejection message due to the product not being offered in New York and you’re not a New York resident then your ISP may be showing your IP as originating from that state. To get around this you can utilize a free VPN to show your correct IP location. I personally enjoy the TunnelBear mobile app.
2) Verify Deposit Address (Optional)
Once you’ve worked through initial setup and before verification, you can double-check that where Ramp will deposit the funds is your friend.tech address:
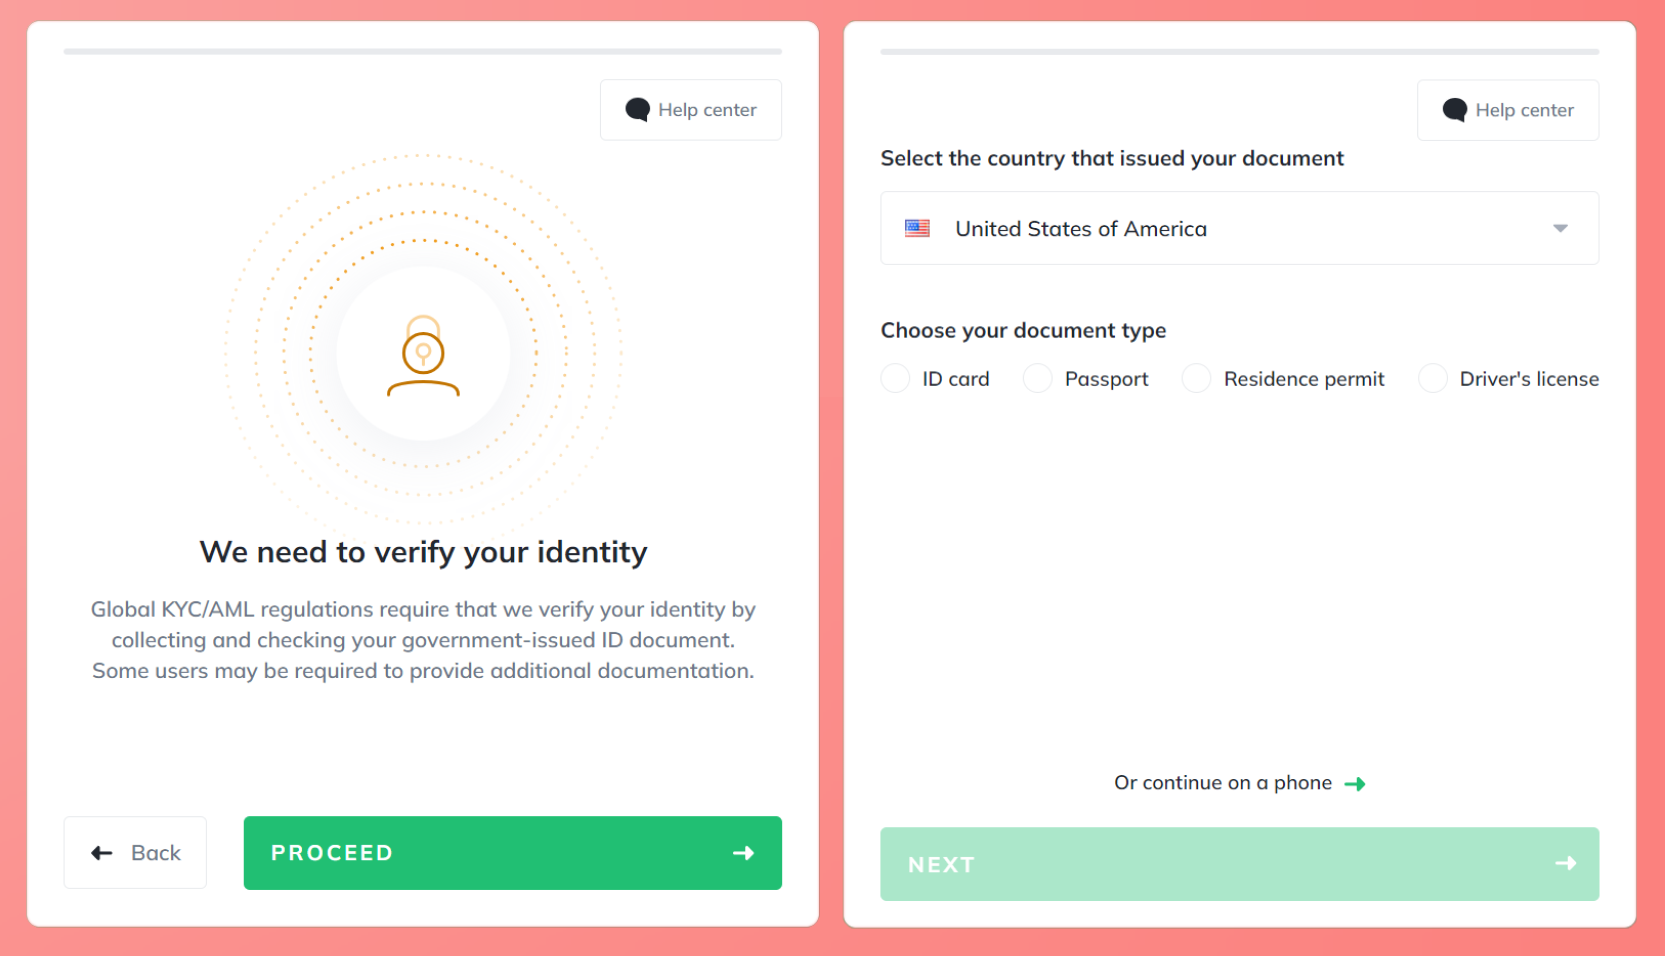
3) Verify your identity
You’ll now be asked to validate that the credit card is yours by matching with a government issued ID and taking a photo.
….and that’s it! You’ll receive $ETH into your account and go forward with creating your profile.
Just in case something went sideways during the above, I’ve compiled a couple of the relevant FAQ responses from Ramp’s site:
Done.
You’re now ready to purchase your first key and enjoy the platform (detailed below).

First key purchase and friend.tech expectations
Now that you’re setup with both a profile and funds you can purchase your first key, which will officially open your room and unlock the rest of the application.
Purchasing your first key
Once you purchase your own key, several things are possible:
Others can now buy your keys as well
This will put them in a shared chat room managed by you
You will earn 5% on all purchases/sales of your keys
These funds will automatically go to your account
You will be able to purchase other creator keys to gain access to their chats

SUMMARY
From here, it’s just getting acquainted with the application. I encourage you to spend time in your room talking to keyholders and once you get comfortable to reach out and join other rooms of creators you have interest in but no natural connection to.
If you’d like to get brushed up on the ecosystem, I have several resources that compile tools, markets and general information:
SETUP THREAD